-
Posted on
Detecting offensive words with Mistral AI 7B
When working on a simple one-time passphrase generator, I stumbled upon the issue of offensive words coming up in the output displayed to users. To solve this problem, I needed a way to detect and filter them out automatically.

A robot censoring books (by Stable Diffusion) Do you really need an LLM for that?
The problem of filtering out offensive words isn’t exactly new. A simple way of solving it would be to use a blacklist of offensive words. There are already quite a few people who did that around the internet. Sadly building an exhaustive list of offensive words is harder than it seems. In most cases, it took me less than a minute to find insults that bypassed those blacklists.
There are also statistical models like profanity-check, which does not use blacklists and should filter a much larger amount of words. But, from my tests, it also does not take very long before you can find words that go through the check but shouldn’t. I think these models may be performing better on whole sentences than single words.
On the other hand, LLMs were trained over an insanely huge text corpus. While I remain skeptical of the claims that LLMs will take over the world, it seems pretty evident that they are excellent tools for natural language processing and should be able to detect offensive words.
Introducing Mistral-7B-Instruct-v0.1
While everyone seems to be using GPT-4, I chose to not follow the wisdom of the crowd and check out Mistral 7B. Since those guys raised a 105m€ seed round, it has to be at least decent. The main selling point compared to GPT-4, is that it is open-source, which guarantees that the model should remain usable even if the company behind it goes under.
I quickly gave up on trying to run it on my laptop, but instead chose to use Cloudflare Workers AI. This service lets you set up serverless LLMs on Cloudflare’s infrastructure. This removes most of the operational complexity, for very little cost.
I decided to use the instruct version of the model. This version was finetuned to follow instructions, so it let us ask it to generate outputs in the format we want. For example, we can ask the model to only reply with “yes” or “no”, which is easy enough to parse.

Photo by Joshua Hoehne The following prompt will check if a given word is offensive or not:
const messages = [
  { role: 'system', content: 'You check if words are offensive, reply using yes or no' },
  { role: 'user', content: word },
];
From this, I built a service that takes a list of words as input and only returns the good ones. It is merely 65 lines of TypeScript, as most of the logic is handled in the LLM’s black box. It can be queried with a POST request, like this:
~ ❯ curl -X POST \
     -H "Content-Type: application/json" \
     -d '["elephant", "murder", "tulip"]' \
     http://localhost:8787

["elephant","tulip"]
Turning that into a dictionary
Cloudflare’s Workers AI is currently in beta, so the API changes all the time, the rate-limiting is not very straightforward and it sometimes throws 500 at you. Calling it directly from a production environment seems out of the question. Thankfully, the English dictionary doesn’t change too often, so we can just check everything once and build a new “clean” dictionary from that.
The dictionary took a couple of hours to generate, as I tried to stay below the imposed rate limit. It is not perfect, but it contains 355424 words (from 370105 in the source dictionary). You can see the result as well as the full code source for this article on GitHub.
-
Posted on
Atlas: Declarative schemas for SQL databases
Database migrations are often one of the most dreaded parts of working with SQL databases. In many cases, teams end up keeping a bunch of timestamped
.sqlfiles and automatically running them in order. While this work, it doesn’t scale well: the more developers you have working on your schema, the more you increase the risk of conflicts. Atlas solves this problem by offering you to define your SQL schemas in a declarative manner, without requiring you to use a specific ORM.
Image by Dariusz Sankowski Imperative vs Declarative
The traditional way of managing database schemas is through imperative changes. It consists of describing the steps required to achieve the state you want. This is consistent with the tools given to us by SQL: once you have created a table with
CREATE TABLE, you’re not supposed to re-useCREATE TABLEbut to append changes withALTER TABLE.Declarative programming works by describing the state you expect and letting your tools figure out how to get there. This is similar to what can be found in languages like Prolog or LISP, or tools like terraform. Declarative solutions are a great match for infrastructure problems because they allow you to keep track of the expected state of your systems, and let you use git for versioning and merging changes. This removes toil from the ops team while increasing visibility on the system’s state.
Getting started with Atlas
To create a table with Atlas, you just have to write a
CREATE TABLESQL statement. Like the following, which I will write in aschema.sql:CREATE TABLE `users` ( `id` int NOT NULL, `name` varchar(100) NULL, `password` char(88) NOT NULL, PRIMARY KEY (`id`) );To run this in my database, you can use
atlas schema apply, which takes the URL of your database using-u, the file path using--to, and the address of a test database (for linting) using--dev-url(you can usedocker://to have Atlas launch an ephemeral docker container).atlas schema apply \ -u "mysql://root:pass@localhost:3306/db" \ --to "file://schema.sql" \ --dev-url "docker://mysql/8/dbNow if you want to modify the table you created, you can modify the
CREATE TABLEstatement inschema.sql. For example, I turn thenamecolumns intoNOT NULL:CREATE TABLE `users` ( `id` int NOT NULL, `name` varchar(100) NOT NULL, `password` char(88) NOT NULL, PRIMARY KEY (`id`) );Rerunning the same
atlas schema applycommand will modify the database appropriately. In the output, we can see that Atlas generated the following SQL statement to achieve that:ALTER TABLE `users` MODIFY COLUMN `name` varchar(100) NOT NULL;Using HCL
Atlas also allows you to use HCL to define schemas. You might already be familiar with HCL if you have been using Terraform, but if not, the main benefit is that it is easy to read and modify for both humans and computers. This is interesting if you ever need your CI to interact with your database schemas.
The
userstable from the previous example would look like this in HCL:table "users" { schema = schema.db column "id" { null = false type = int } column "name" { null = false type = varchar(100) } column "password" { null = false type = char(88) } primary_key { columns = [column.id] } }As a bonus, HCL doesn’t require a database for linting, so if you choose to use this, you can skip the
--dev-urlparameter when applying.
Image by Michael Gaida Migrating an existing system
With an already running database, you can use
atlas schema inspectto generate the schema files. It also requires a-uparameter for the database URL and--formatfor the output format (SQL/HCL/JSON).atlas schema inspect \ -u "mysql://root:pass@localhost:3306/db" \ --format '{{ sql . }}'If you are already using an imperative migration system, and do not want to throw it away right now, you can also use Atlas to generate migration files. This is done using the
atlas migrate diff [migration_name]command, which takes a--dirparameter for the migration folder, a--toparameter for the schema file, and a--dev-urlparameter like the apply command.atlas migrate diff my_migration \ --dir "file://migrations" \ --to "file://schema.sql" \ --dev-url "docker://mysql/8/test"Use
atlas migrate applyto run the migrations:atlas migrate apply \ -u "mysql://root:pass@localhost:3306/db" \ --dir "file://migrations"Integrating Atlas to your Go codebase
After using Atlas for a bit, you might need to write a wrapper for it or want to use it as part of your custom infrastructure tooling. This is made simple with their Go SDK. The packages
ariga.io/atlas-go-sdk/atlasexecwill expose all the high-level functions that you can use for that.The example below behaves like
atlas schema apply:func main() { client, err := atlasexec.NewClient(".", "atlas") if err != nil { log.Fatalf("failed to initialize client: %v", err) } params := atlasexec.SchemaApplyParams{ URL: "mysql://root:pass@localhost:3306/db", To: "file://schema.hcl", } res, err := client.SchemaApply(context.Background(), ¶ms) if err != nil { log.Fatalf("Failed to apply schema: %v", err) } log.Printf("Applied %d changes (%d pending)\n", len(res.Changes.Applied), len(res.Changes.Pending)) } -
Posted on
5 kubectl plugins to make your life easier
I have been using Kubernetes for five years, but only very recently started using plugins to enhance my kubectl commands. I will show you five plugins that help me avoid repetitive tasks, make cluster administration simpler, and incident response less stressful. All the plugins presented in this article are installable using Krew.

Photo by Iker Urteaga Note for Mac users
If you’re using an ARM Mac, most of the plugins I mention will appear uninstallable when using Krew. It is generally because the plugin authors didn’t release a mac-arm64 build. But you can install the mac-amd64 builds, which work as well, by overriding the KREW_ARCH environment variable. For example:
KREW_ARCH=amd64 kubectl krew install janitorTail
Logging pods through
kubectl logs -fis always a good way to know what a running pod is doing. Sadly, I never manage to remember how to make it log multiple pods at once. The tail plugins solve that, by giving us a set of helper functions to easily stream the logs of a group of pods. For example, it can retrieve logs from all the pods created by a Job, or all the pods attached to a Service:❯ k tail --job=logging-job default/logging-job-xtx4s[busybox-container]: My log ❯ k tail --svc=mikochi default/mikochi-69d47757f6-9nds7[mikochi]: [GIN] 2023/07/27 - 12:31:16 | 200 | 496.098µs | 10.42.0.1 | GET "/api/refresh" default/mikochi-69d47757f6-9nds7[mikochi]: [GIN] 2023/07/27 - 12:31:16 | 200 | 10.347273ms | 10.42.0.1 | GET "/api/browse/" default/mikochi-69d47757f6-9nds7[mikochi]: [GIN] 2023/07/27 - 12:31:16 | 200 | 9.598031ms | 10.42.0.1 | GET "/api/browse/" default/mikochi-69d47757f6-9nds7[mikochi]: [GIN] 2023/07/27 - 12:31:19 | 200 | 193.686µs | 10.42.0.1 | GET "/ready"Janitor
Janitor is a kubectl plugin that allows you to list resources in a problematic state. Instead of battling with grep, it gives you access to commands to automatically list unhealthy, unready, or unscheduled Pods, failed Jobs, pending PVCs, and or unclaimed PVs. This is helpful when examining a cluster during an incident, as it can directly point you toward ongoing issues.
❯ k janitor pods status
STATUS             COUNT
Running            4
Error              6
ImagePullBackOff   1

❯ k janitor pods unhealthy
NAME                 STATUS             AGE
failing-job-ln7rf    Error              4m40s
failing-job-vbfqd    Error              4m33s
failing-job2-kmxqm   Error              4m30s
failing-job-cjbt6    Error              4m27s
failing-job2-grwcn   Error              4m23s
failing-job2-s842x   Error              4m17s
my-container         ImagePullBackOff   17m

❯ k janitor jobs failed
NAME           REASON                 MESSAGE                                       AGE
failing-job    BackoffLimitExceeded   Job has reached the specified backoff limit   4m46s
failing-job2   BackoffLimitExceeded   Job has reached the specified backoff limit   4m36s
Neat
Neat is a simple utility to remove generated fields from the command output. You can use it by simply piping the output of
kubectl getintokubectl neat. This makes for a more readable output and is very convenient if you want to save the yaml to create a new resource.❯ k get pod -o yaml mikochi-69d47757f6-9nds7 apiVersion: v1 kind: Pod metadata: creationTimestamp: "2023-07-21T12:30:58Z" generateName: mikochi-69d47757f6- labels: app.kubernetes.io/instance: mikochi app.kubernetes.io/name: mikochi pod-template-hash: 69d47757f6 name: mikochi-69d47757f6-9nds7 namespace: default ....... ❯ k get pod -o yaml mikochi-69d47757f6-9nds7 | k neat apiVersion: v1 kind: Pod metadata: labels: app.kubernetes.io/instance: mikochi app.kubernetes.io/name: mikochi pod-template-hash: 69d47757f6 name: mikochi-69d47757f6-9nds7 namespace: default .......View-secret
Since the data inside Secrets is base64 encoded, reading them often results in a mix of
kubectl get,jq, andbase64 -d. The view-secret plugin aims at simplifying that, by allowing you to directly read and decrypt values from secrets.❯ k view-secret mikochi username [CENSORED] ❯ k view-secret mikochi password [ALSO CENSORED]Node-shell
If you want to directly access a node, finding the node IP, using SSH with the right RSA key, etc… can make you lose precious time during an incident. But it is possible to obtain a root shell from a (privileged) container using nsenter. The node-shell plugin leverages this to give you access to the nodes in a single kubectl command:
❯ k node-shell my-node spawning "nsenter-qco8qi" on "my-node" If you don't see a command prompt, try pressing enter. root@my-node:/# cat /etc/rancher/k3s/k3s.yaml apiVersion: v1 clusters: - cluster: ....... -
Posted on
Is technical analysis just stock market astrology?
Technical analysis is a part of finance that studies price moves to guide investment decisions. A lot of investors seem skeptical of the use of past price data, which leads to technical analysis often being perceived as similar to astrology. In this article, I will try to see if it can provide an edge to long-term investors and if it beats reading the horoscope.

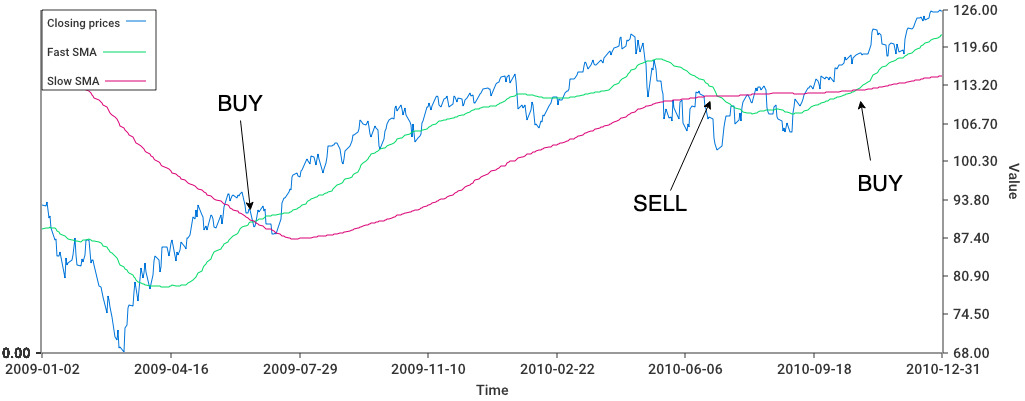
Photo by Chris Liverani Moving Average Crossover
There are hundreds of different technical analysis strategies and indicators out there. For this article, I decided to pick what seemed to be one of the simplest: SMA crossovers.
Simple Moving Averages (SMA) are, as the name suggests, just an average of past closing prices. The SMA Crossover strategy uses two moving averages, a “fast” one (50 days) and a “slow” one (200 days), and compares them to decide on buying or selling an asset. If the fast SMA is above the slow one, we should buy and hold the stock, and if this condition inverts, we should sell. It is a heuristic around momentum, which is the idea that if an asset price starts rising, we can jump on the bandwagon and hope it will continue its trajectory.
I have backtested an SMA crossover strategy on the SPY ETF, one of the most traded passive investment funds in the world. My backtest makes the following assumptions:
- we do not pay any transaction fees
- we will obtain exactly the close price when buying or selling
- dividends received while holding stocks are immediately reinvested
- cash yields no interests
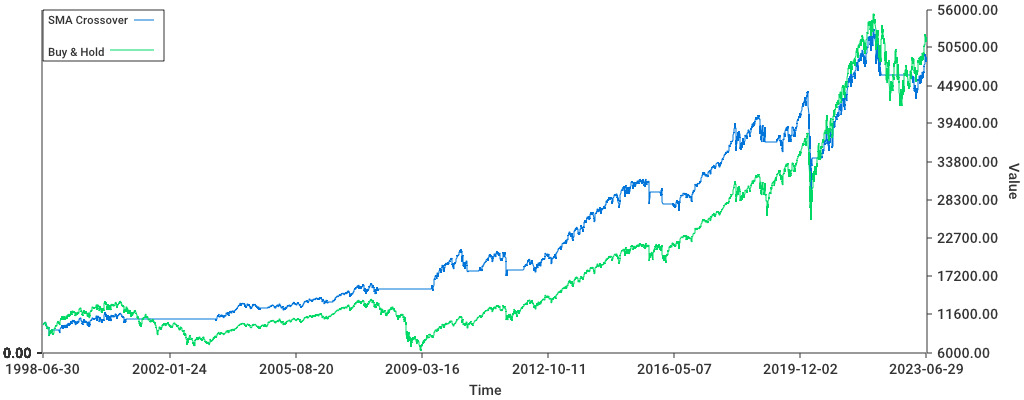
While someone who would have bought 10.000$ of SPY in July 1998 and continuously held the stock would have ended up with 52.030$ in June 2023 (6.78% annualized), an investor using the SMA crossover strategy would have made ended up with 49.127$. (6.54%). Even without accounting for transaction costs, the SMA crossover strategy doesn’t provide a significant over-performance to simply buying and holding over a long period.
Does this mean that this strategy is completely useless?
Actually no, a closer look at the data will show that the SMA crossover strategy allows investors to avoid extended drawdowns, like the 2008 crisis. This significantly reduces the risk taken by investors: the yearly standard deviation of the SMA crossover strategy is only 13%, against 19% for the buy and hold strategy. Since returns didn’t decrease as much as risk, this leads to high risk-adjusted returns, as measured by the Sharpe ratio: 0.43 for passive investing vs 0.53 for SMA crossovers.
But what about astrology?
Of course, the subject of this article wasn’t to compare technical analysis to buy and hold, but to astrology. I was surprised to learn that financial astrology was actually a thing and that there were also a lot of astrology-related strategies out there. I decided to implement a strategy based on lunar cycles since it was one of the clearest about when to buy and when to sell.
The strategy goes as follows: we purchase SPY on a new moon, and re-sell it on the next full moon. And repeat that every lunar month.
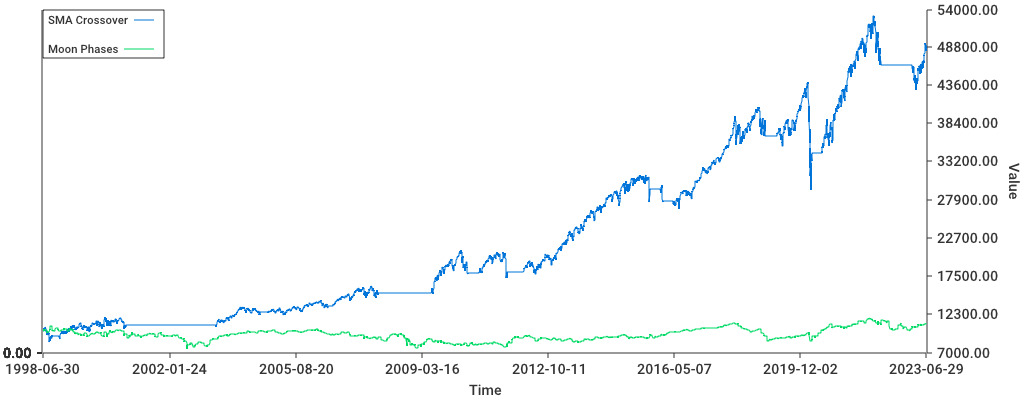
Clearly, it fails at beating SMA crossovers. Or at doing basically anything, an investor using the moon phase strategy starting with 10.000$ would end up with only 11.110$ and a Sharpe ratio of only 0.09.
Conclusion
Similarly to diversification, simple technical analysis strategies can be used to minimize investment risk, without necessarily reducing profits by the same amount. There’s however no guarantee that a strategy that worked in the past will continue working in the future. It is also likely that there exist smarter momentum indicators than moving averages, but you’ll have to do your own backtests for those.
-
Posted on
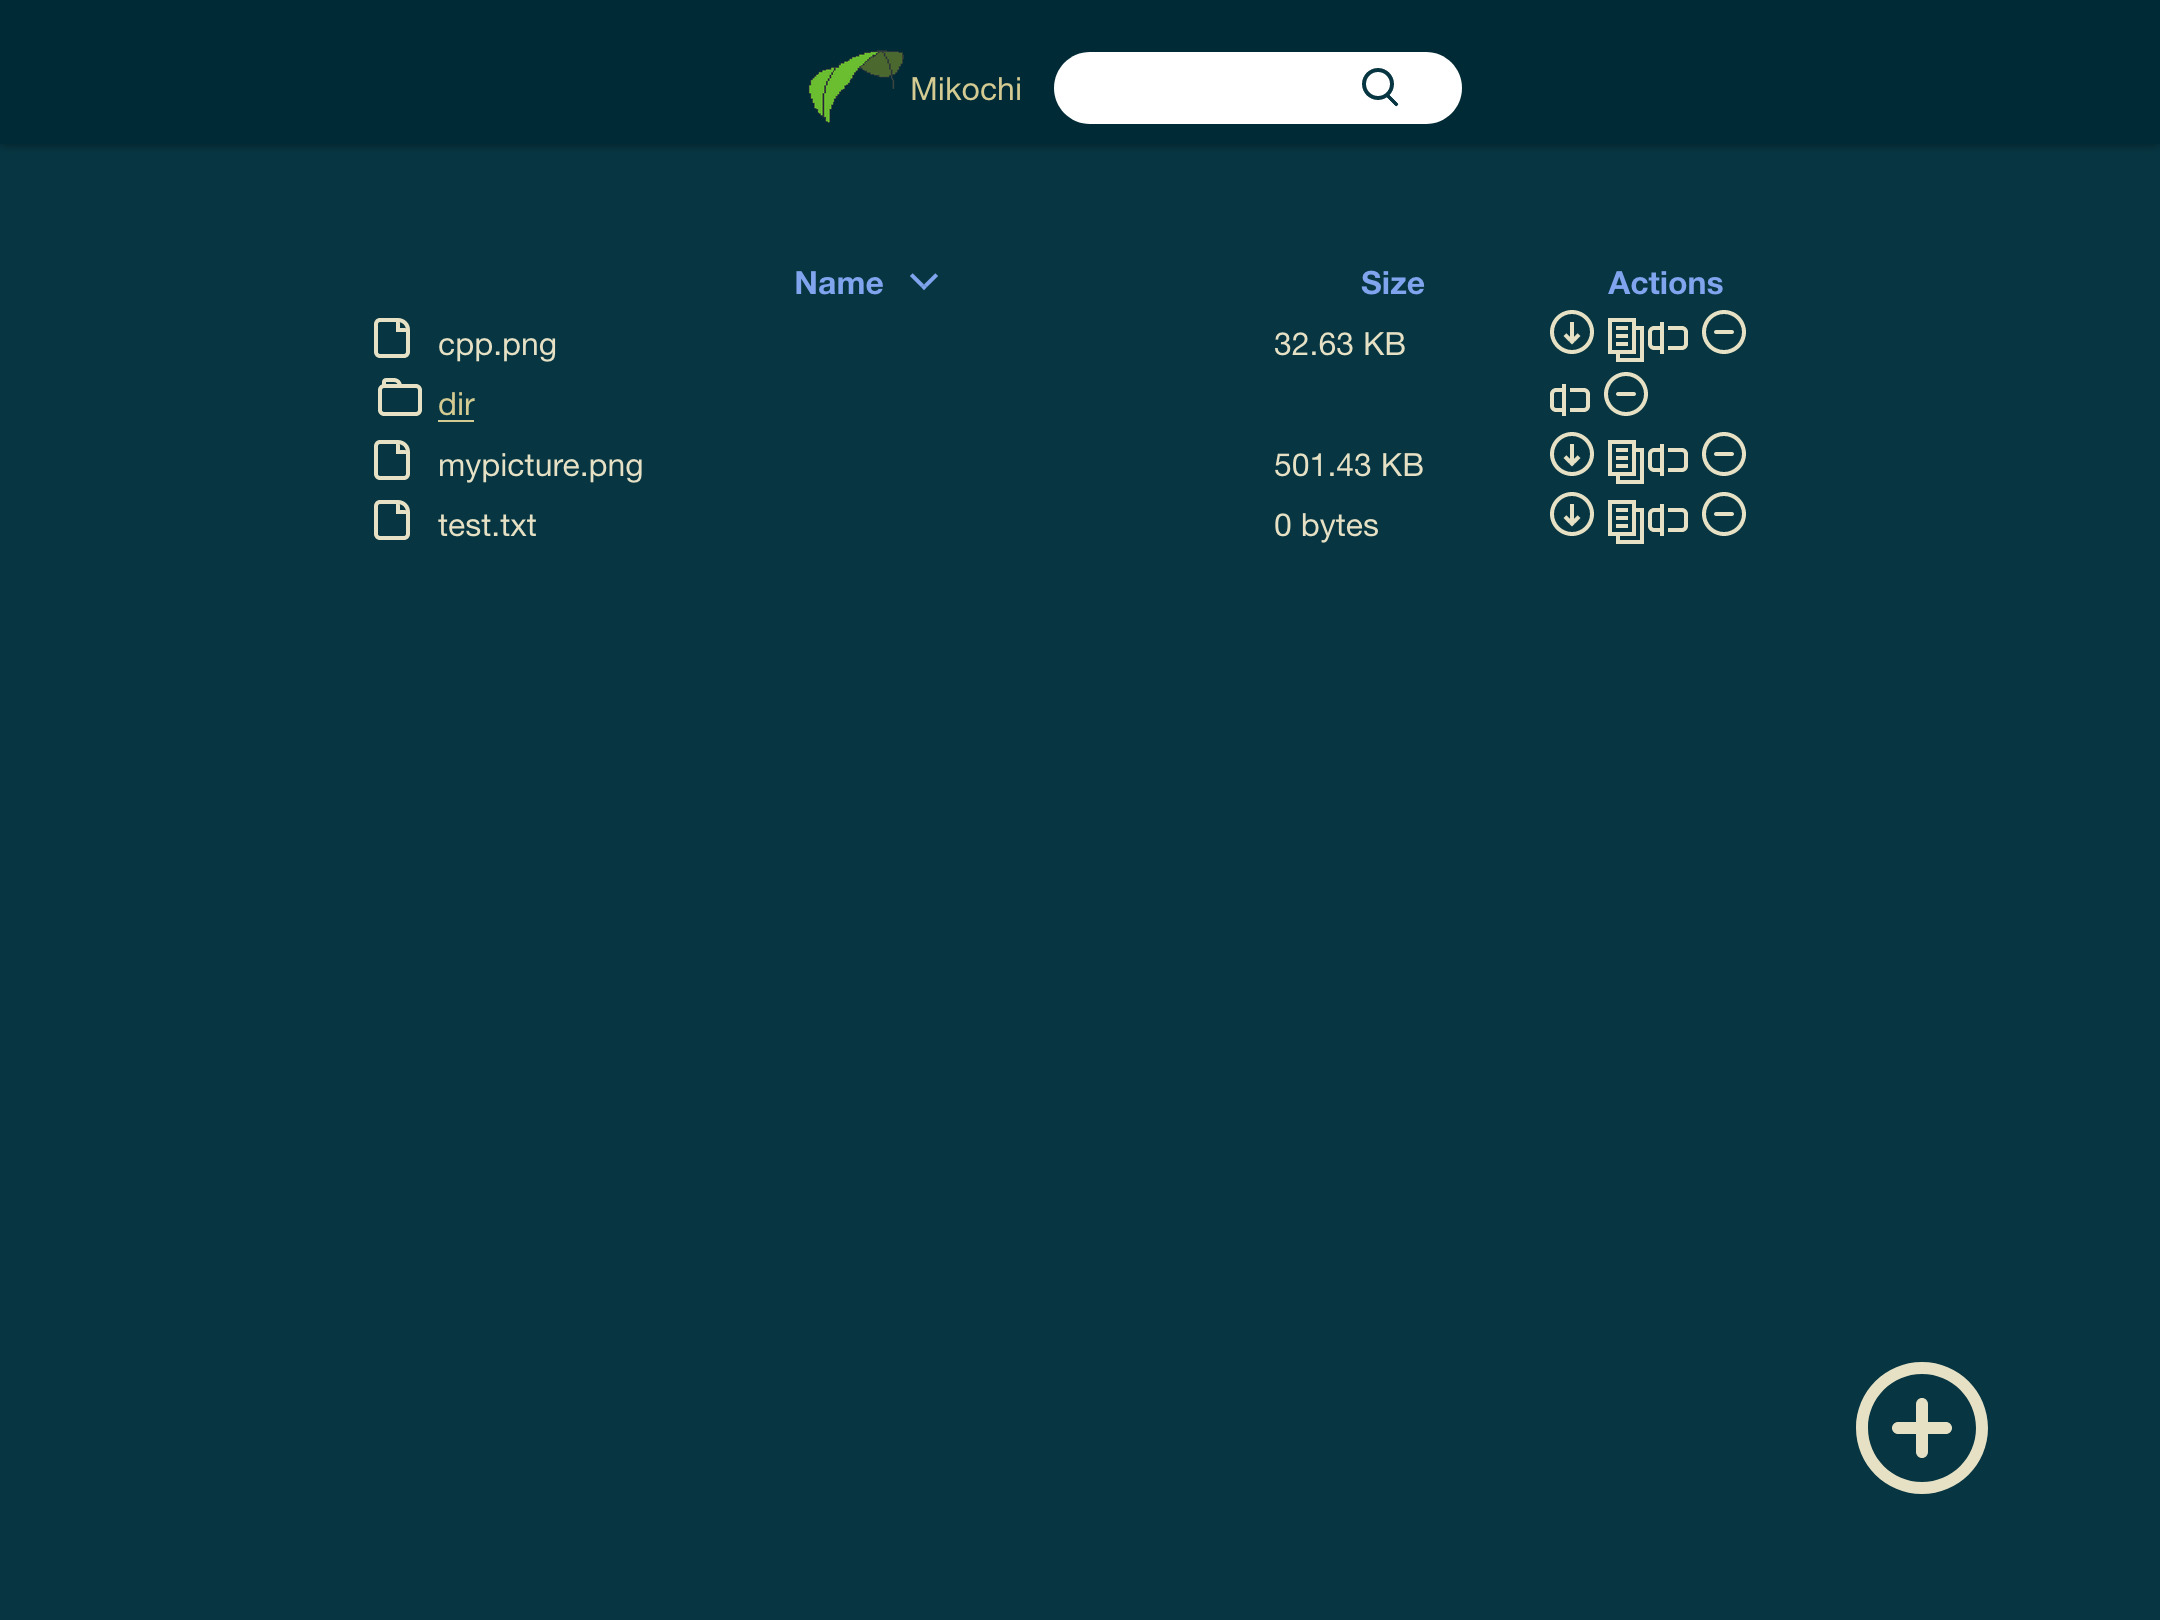
Introducing Mikochi: a minimalist remote file browser
Like many people working in DevOps, I have taken the bad habit to keep playing with servers and containers in my free time. One of the things I have running is a Media Server, which I use to access my collection of movies and shows (that I evidently own and ripped myself). To make my life easier with this, I have built a web application that allows me to browse, manage, and stream/download files. It is called Mikochi and received its first stable release last week.
Problem statement
My media server was initially running Jellyfin. It is a pretty nice piece of software that probably fits the need of many people. Sadly for me, it focuses a lot on areas I didn’t care about (metadata, transcoding, etc) while being lackluster on classic file management.
The features I need is to have basic FTP-like management from a browser. This means it needs to list the content of folders and allow navigation between them while allowing to download, rename, delete, and upload files.
In addition to that, I also wanted a search function that could lead me to any file/directory in the server.
Since it’s replacing a media server, the last requirement was streaming. I do not use streaming in the browser much (since it doesn’t always support fancy codecs like HEVC), so I just needed to be able to read it from a media player like VLC or MPV, which is easier.
Frontend
One of my aims in this project was to get back into frontend development since I didn’t touch a line of JavaScript in a while. For this project, I decided to use Preact, a React alternative weighing only 3kb.
Preact was a great surprise. I expected a framework that small to be too good to be true, but it works well. I didn’t experience any trouble learning it since it is almost the same API as React and didn’t encounter any performance issues or unexplainable crashes. I will definitely try to use it again for future projects.
The complete JS bundle size ends up being ~36kb, barely more than the icon pack that I use.

The character who gave this software its name Backend
The backend was made using Go, which has been one of my main languages for the past 5 years. I used the Gin framework to handle the regular HTTP boilerplate, which worked admirably.
The only pain point I had was re-implementing JWT authentication. I had decided to not use a library for that because I felt that, it might not handle an edge case well: I need tokens passed in GET params for streaming requests, since VLC isn’t going to write a
Authorizationheader. It’s not particularly complex but it is a lot of code.I had the good surprise that streaming files “just works” in a single line of code:
c.File(pathInDataDir)Running it
If you’re interested in trying out Mikochi, it can be launched with just a Docker image:
docker run \
-p 8080:8080 -v $(PWD)/data:/data \
-e DATA_DIR="/data" -e USERNAME=alicegg \
-e PASSWORD=horsebatterysomething zer0tonin/mikochi:latest
Compiled binaries are also available on GitHub. And for those who love fighting with Ingresses and PersistentVolumeClaims, there’s a helm chart available.
subscribe via RSS