-
Posted on
Specialization considered harmful
It is sometimes recommended that software engineers should learn “depth-first”, and seek to specialize early in their careers. I think his advice is misguided. In my opinion, having a wide range of knowledge is in many cases more important than being extremely good at a very specialized task. I will use this article to make the case for avoiding specialization as a software engineer.

Photo by Kenny Eliason It’s not just about practice hours
A common misconception when learning a new skill is that, since it might take 10,000 hours to master it, the best thing to do is to start practicing as early as possible and with as much focus as possible. Reality is however not as simple.
It may be true that just putting in a lot of focused practice hours will lead to amazing results in problems that are very constrained in scope (like chess). However, for subjects that have a very broad, and frequently evolving set of problems, experience working on very diverse subjects will often perform better than intense specialization.
One of the reasons behind that is that many problems that are at first sight unrelated will have similar patterns. Being exposed to a wide variety of problems allows you to see a lot of potential patterns between problems.
This is why history has many records of people achieving breakthroughs in many fields. For example, Benoit Mandelbrot first noticed the concept of fractal by studying probability distributions in financial markets, he managed to find an application of the concept to many patterns that appear in nature, such as coastlines, clouds, and blood vessels.
Tech changes, fast
Many people underestimate how fast the world of software engineering can change. Some extremely popular concepts like “DevOps” were pretty much not a thing 10 years ago. 20 years ago, I doubt anyone would have known what differentiated a “frontend developer” from a “backend developer”. Even if you zoom on very specific technologies, things are changing every year: React code written in 2023 doesn’t have much in common with React code written in 2015.

Photo by Lorenzo Herrera Being a generalist, allows you to adapt much faster to change, it can be seen as a way of “learning to learn”. Once you have been exposed to many problems and solutions, picking up new tools and adapting to changes in the field becomes easier and easier.
There’s more to software engineering than code
Most importantly, learning the ins and out of a programming language and tech stack is not what brings value. Software engineering is the art of using computers to solve problems. Those problems are generally not about computers, but involve businesses and people. In my experience, this is a point that is easy to miss when over-focusing on the depth of a specific technology.
This is also where a lot of people who make a career change and transition late into the tech industry have an edge. They can compensate for their late start by being more aware of the reality of business and the needs of organizations.
-
Posted on
Why diversification matters for long-term investors? Meet Shannon's Demon
Any introduction to finance will mention that diversification is extremely important. Intuitively, it is easy to understand that diversification reduces risks. If I own stocks in two companies, and one of them goes bankrupt, I lose less than if I had invested all my money in it. However, what appears less intuitive is that diversification itself will increase investment portfolio returns. This phenomenon is known as Shannon’s Demon, from the name of its inventor Claude Shannon, also famous for his work on cryptography.

Photo by micheile dot com Let’s take the following scenario: I am an investor who can purchase two assets with completely random and unpredictable returns. My crystal ball is broken, so I cannot know in advance which of the two assets will perform better. They can be modeled by a random walk. Any change to my investment portfolio will cost a 1% transaction fee.
I can use the following two strategies:
- put 100% of my money in one of the two assets and hope it performs well
- put 50% of my money in each asset and rebalance the portfolio every 6 months to keep each position at 50%
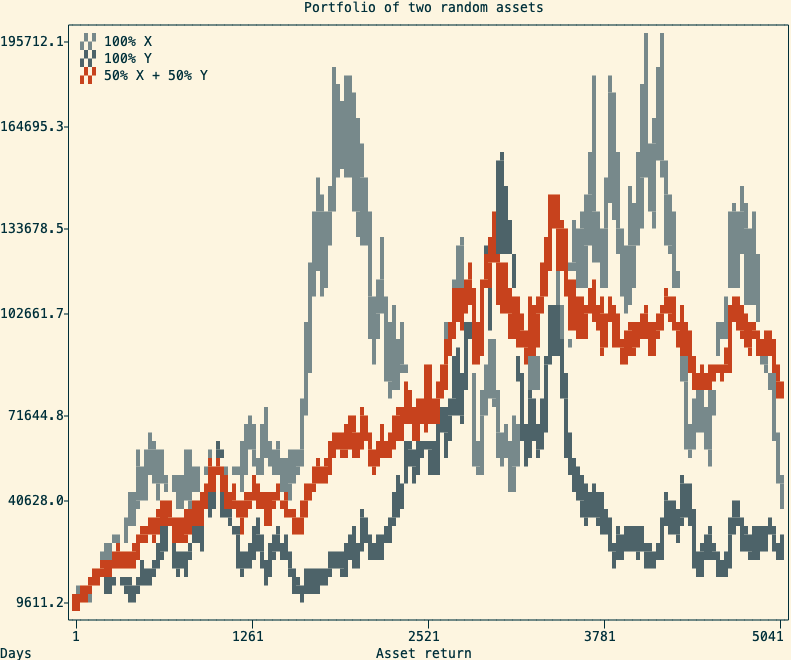
A cherry-picked example of the return of two random assets and a balanced portfolio (in red) I made a Monte-Carlo experiment that simulates the above scenario 100,000 times over 20 years (5040 trading days). After inspecting the final returns, I observed the following:
- in nearly 100% of outcomes, the balanced portfolio beats investing everything in the worst-performing asset
- in 70% of outcomes, the balanced portfolio also beats investing everything in the best-performing asset
Explanation
The second observation might be surprising, but can be easily explained. The trick is that regular rebalancing will create a mechanical way to “buy low and sell high”.
Let’s illustrate it step by step:
- at the start, I own 500 of asset X, for a value of 10$ each, and 500 of Y for the same value
Name Price Position Value X 10$ 500 5,000 Y 10$ 500 5,000 - after 6 months, my position in X experienced explosive growth and now trades at 50$, while Y is stable at 10$
Name Price Position Value X 50$ 1000 25,000 Y 10$ 500 5,000 - I rebalance the portfolio, and now own 15,000$ in X and 15,000$ in Y
Name Price Position Value X 50$ 300 15,000 Y 10$ 1,500 15,000 - 6 months later, X performed poorly and is back at 10$, while Y is now worth 20$
Name Price Position Value X 10$ 300 3,000 Y 20$ 1,500 30,000 - I rebalance, and now own 16,500$ in X and 16,500$ in Y
Name Price Position Value X 10$ 1,650 16,500 Y 20$ 825 16,500 Over the last scenario, my portfolio gained 23,000$. If I had invested everything into Y, I would have gained only 10,000$. And if I had bough and held X over the same time, I would not have made any profit.
Caveat 1: correlated assets
One important thing to consider is that this only work with assets that are not positively correlated. A positive correlation means that both assets will move up at the same time, and down at the same time. In this situation, the balanced portfolio will still perform better than the worst of the two assets, but will most of the time underperform the best-performing asset.
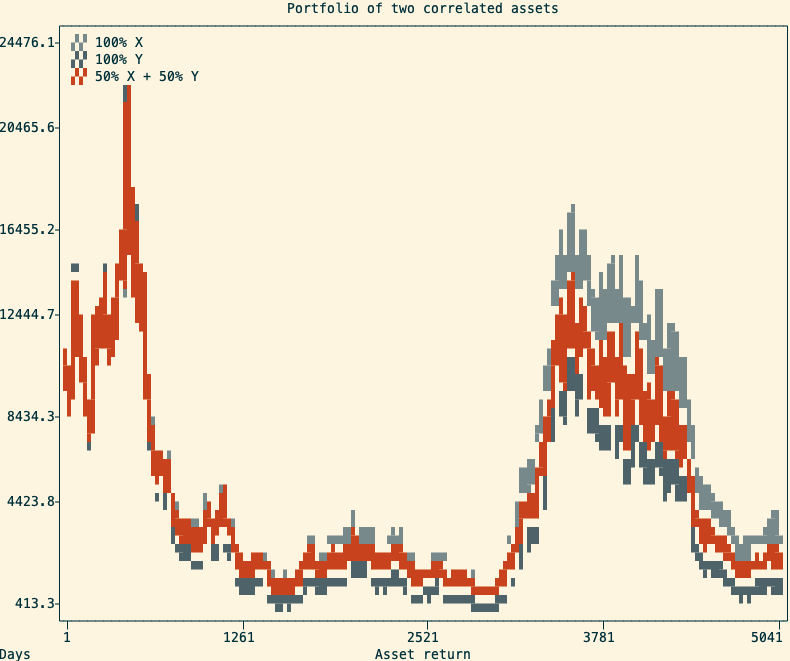
The return of two positively correlated assets and a balanced portfolio (in red) containing both In practice, many asset returns are very correlated with each other. For example, in the stock market, we can observe periods where the large majority of stocks tend to move up (bull markets) or down (bear markets). This makes the creation of a diversified stock portfolio more complicated than just randomly picking multiple stocks to purchase. This is also why it is often advised to diversify across multiple asset classes (ie, stocks, bonds, commodities, and cash).
A common way to make use of Shannon’s Demon is to use an asset with a stable price (ie. a money market fund) alongside a volatile one. A portfolio with 50% cash and 50% in a volatile asset will not only cut the risk in half but sometimes outperform being 100% in a single volatile asset. Simulating 10000 random walks over 20 years, in 91% of cases, the balanced portfolio beats investing everything in the random walk.
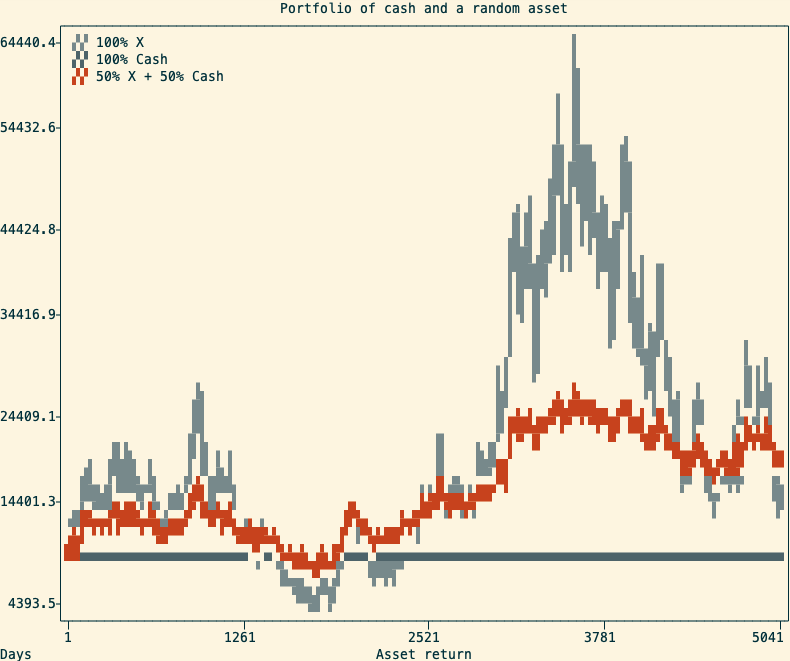
A simulation of a stable and a volatile asset and the resulting balanced portfolio An alternative use of Shannon’s Demon is to profit from negatively correlated positions. This can be done by taking two positively correlated assets and being long on one, and short on the other. This strategy is called pair trading, and it is not something you should try at home.
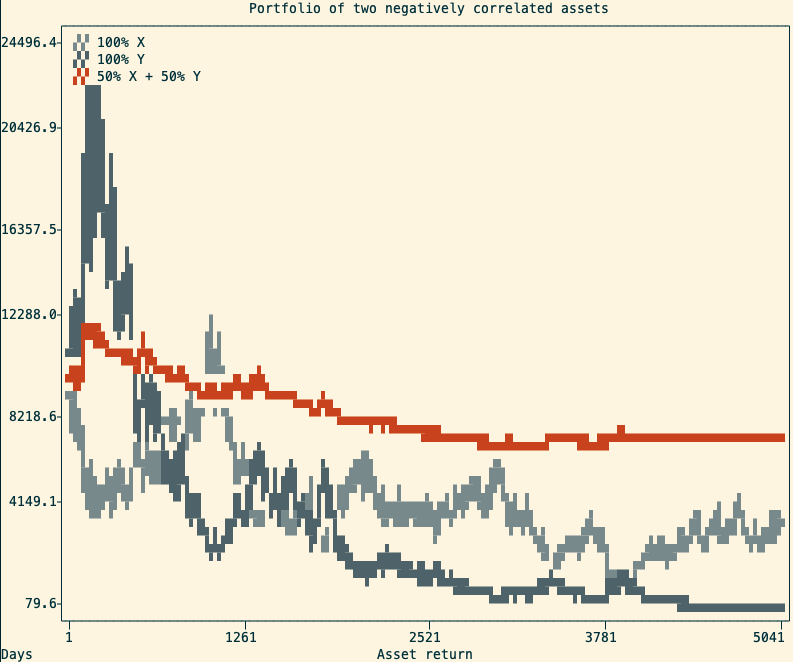
An example of two negatively correlated assets and the resulting portfolio Caveat 2: real-life is not as simple
Obviously, there’s more to portfolio management than just diversification and rebalancing. First, the 50/50 repartition I used in this article is rarely optimal. The common calculation used for optimal position sizing is the Kelly criterion, which would need an entire article dedicated to it to cover it properly.
In previous examples, I used a fixed 6 months period between rebalances. I chose this period for completely arbitrary reasons. An optimized rebalancing strategy would need to take into account asset variances, investment time-frames, and transaction costs to determine the rebalancing intervals.
Lastly, while simulations using random walks are a useful mathematical tool, they might not reflect real market conditions. A portfolio composed of assets that are likely to depreciate over time is unlikely to be profitable, no matter how diversified it is. This is why asset purchases should be carefully researched, eventually with the help of a professional financial advisor (not me).
-
Posted on
Learning Dutch online in 2023
Back in 2020, I left France to live in the Netherlands. Since then, I have spent some time learning the language and reached an intermediate (B1-B2) level. While learning Dutch is not a hard requirement to live and work in the country, it does make day-to-day life a bit more convenient. There are plenty of resources out there to learn languages, so here’s my pick of tools that are worth spending your time on.

Photo by Artem Shuba Duolingo
Duolingo is probably the most famous language-learning app around. Despite its popularity, many people in the language learning community will dismiss it as just a toy. It is, in my opinion, actually great for beginners. One of the main benefits of it is that it focuses on complete sentences, and will drill the sentence structure of your target language in your head.
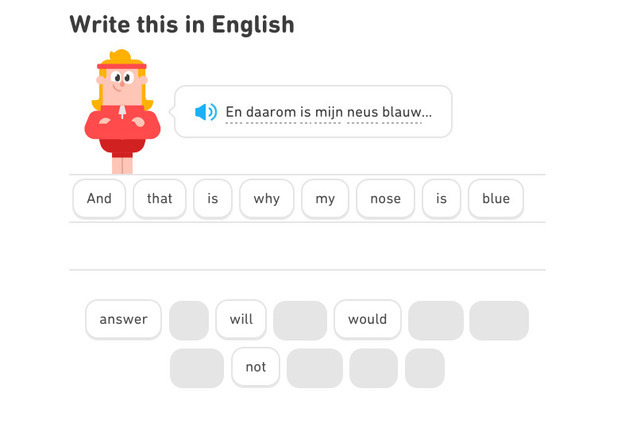
However, once you have acquired a basic idea of your target language’s grammar the application loses any usefulness. Duolingo is sadly extremely slow at introducing new vocabulary, and going across the whole course is unnecessarily time-consuming. Which I guess is a consequence of its subscription business model. The gamification makes it addictive enough that I reached a 300 days learning streak, but I would honestly not recommend using it for more than six months.
Anki
Anki is a very often recommended option in language learning communities. It is a spaced repetition app, that will show you flashcards and ask you if you know the correct translation. Unlike Duolingo, Anki is essentially focused on vocabulary.
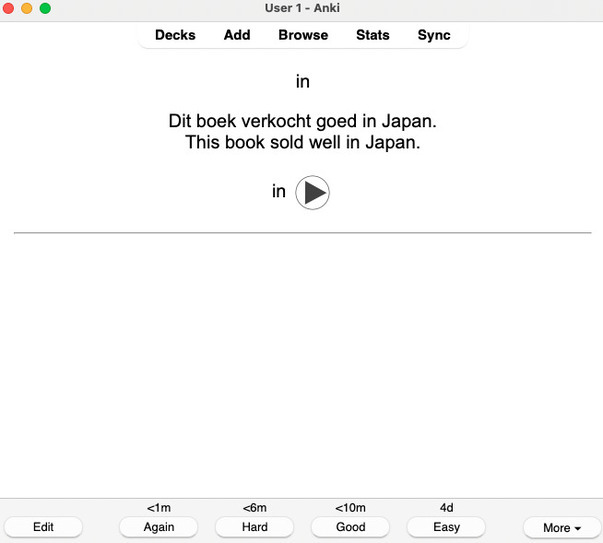
It is free and open-source software, so the application gives you a lot of customization options, which lets you introduce new words at the rhhythm you want. A few Dutch decks are available online, but many Anki users prefer creating their own decks with words they encounter in target language content.
Anki didn’t stick with me, I think the issue was the lack of variety in exercises. Doing the same thing to every flashcard turned the activity into a chore (instead of the addictive game that Duolingo was).
Memrise
Memrise is my personal favorite. Like Anki, it is a spaced repetition app, which focuses on memorizing vocabulary. But it is much more enjoyable than Anki because it alternates between different exercise variations. Adding to that, their repetition algorithm seems smarter, making for a more enjoyable and efficient learning experience.

It contains seven official courses, for a total of more than 2000 words. Which is largely enough content to start engaging with native content. Additional content is provided by the community.
Just like Duolingo, some features are locked behind a subscription.
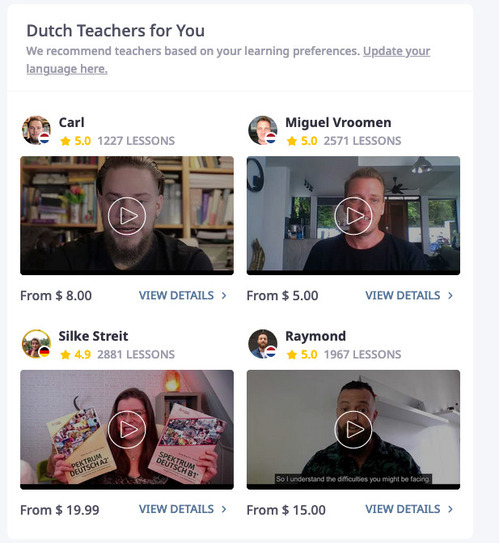
Italki
Unlike the previous apps, Italki is not focused on providing exercises but on matching students with language teachers. Some could say it is the “Uber” of language learning, providing cheap and personalized courses. It is a pretty good way of getting into some conversation practice, which is especially useful if you are not in the country. The experience will vary from teacher to teacher, but I had a great time using it.
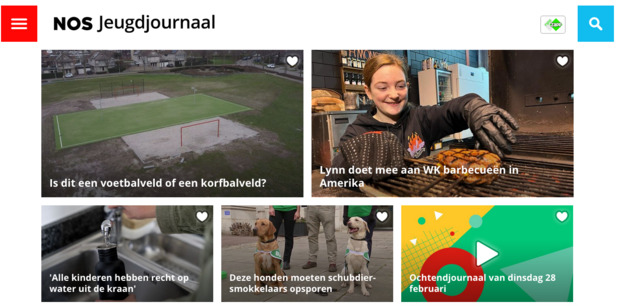
Native content
Of course, apps and courses are a great help when learning a language, but exposure to native content is what will help the most in the journey toward fluency. In the beginning, I found NOS Jeugdjournaal to be very helpful. It is the kid’s version of the NOS newspaper and comes with shorter articles, simpler vocabulary, and less depressing news. Most articles are accompanied by video clips which also helps build your listening, and their daily “Ochtendjournaal” can be easily fit into a routine.
For more advanced learners, there are quite a few Dutch TV shows and movies around. Amongst my personal favorites are the Dirty Lines show, which is about two brothers creating the first dutch phone-sex line, and the movie De Oost, which covers the story of a dutch soldier in the Indonesian War of Independence. You can find a list of Dutch movies on IMDB.
-
Posted on
How much can you really get out of a 4$ VPS?
When starting a new project, evaluating the budget needed for cloud hosting can be a tricky question. On one side, you will hear horror stories of people waking up to an unexpected 100k$ bill from their provider. But on the other hand, you will see providers advertising costs sometimes as low as 4$ per month for a virtual machine. In this article, I will perform load testing on one of those 4$ VPS (from an unnamed provider) to figure out if the promise of running your production on such a low budget is realistic.

Photo by Annie Spratt The test application
For this test, I designed a simple CRUD application in Go. It mimics a blogging application and lets user create posts, lists the latest posts, and display a single post. In other words, it has the following three routes:
- a
GET /route that renders an HTML template and shows the title of the 10 latest posts - a
GET /<post_id>route that renders an HTML template and shows the title and body of the selected post - a
POST /route that accepts a JSON with the post title and body, timestamps it, stores it in the database and redirects toGET /
For the database, I chose to use MongoDB. I picked it because it is simple to set up, popular, and claims of being web scale.
The application was developed without making any particular performance optimizations. The only database-specific optimization I created was to create an index on the post timestamps, which allows listing the latest posts decently fast.
Both the application and MongoDB were deployed using Docker with docker-compose.
The load test
I used K6 to perform a load test. K6 is a software that will generate “virtual users” who continuously run test scenarios defined using javascript.
I defined two scenarios:
- 10% of users would be creating posts
- 90% of users display the latest 10 posts, and then open one of those posts (picked at random).
The test would progressively ramp up until we reach 50 virtual users and then come back down, for a total test duration of 1min30s.
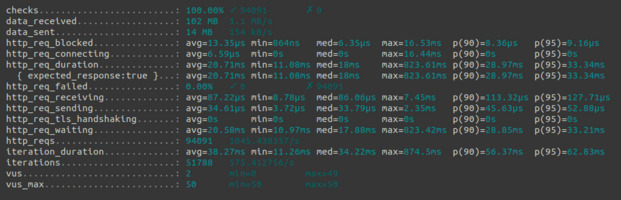
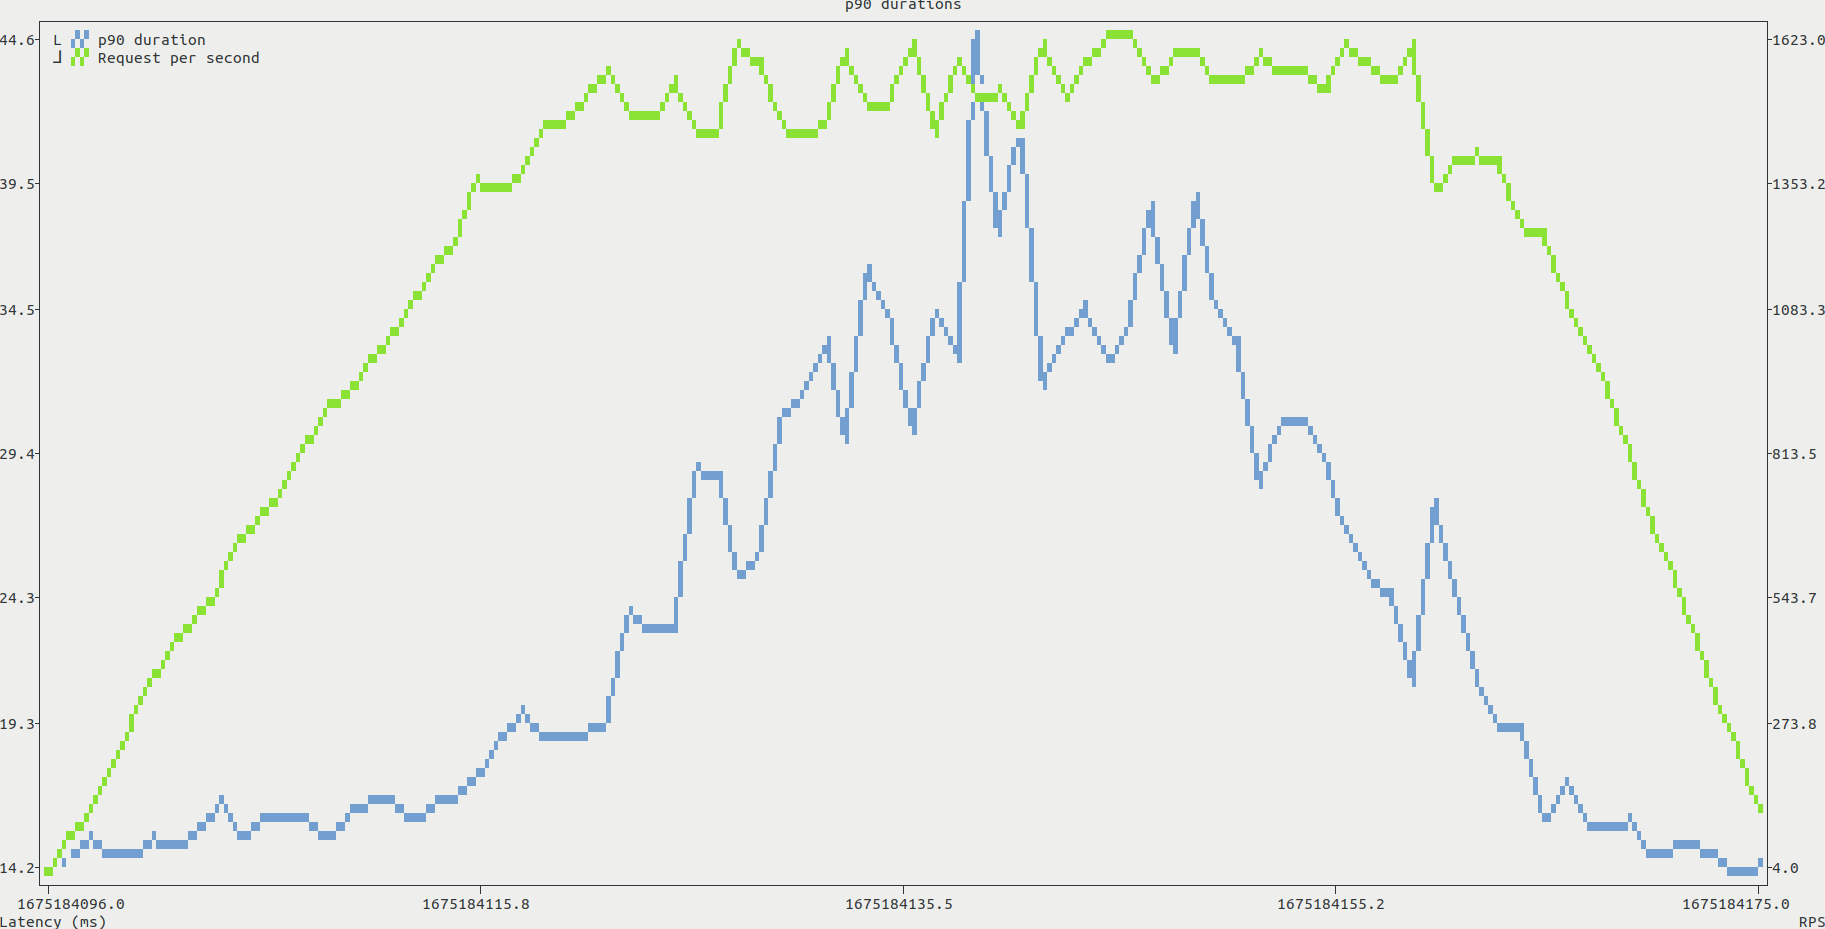
Launching the test from my local computer, k6 managed to succesfully run more than 94k request, with an average duration of 21ms per request, and a 95 percentile duration of 33ms. While this test didn’t reach the point where the server would be failing, a closer look at the data already gives more insights. I exported k6 metrics to a CSV, and used pandas to analyze the data. Plotting the request durations against the number of requests per second we can observe that the duration starts spiking when k6 sends around 1300 requests/seconds.
During the tests, we can identify a potential bottleneck. The CPU load increases with the number of virtual users, and quickly reaches 100%. This is shown in the htop screenshot below, with both mongo and the application itself requesting most of the available CPU. In contrast, both RAM and disk throughput seemed to be steadily lower than the system capabilities.

Conclusion and limitations
This test shows that, as long as you don’t plan on building the next Twitter, a very cheap VPS might be fine for the start of a project. However, this result might seriously differ from real life applications because those contain complex business logic requiring more resources than a simple CRUD application. Adding to that, more networking overhead is bound to happen when clients connect from different IPs and use TLS, which I did not do in the above test.
The best way to determine the hosting budget for a real application would be to test it until failure using a distributed k6 setup. This can be done using the k6 operator for kubernetes or the (somewhat expensive) k6 cloud.
You can find the source code for the application, k6 scenarios and analysis script used in this article on my GitHub.
- a
-
Posted on
Does ChatGPT dream about cryptographic cats?
Back in 2017, the tech world seemed to be constantly talking about a single subject: Blockchains. Two years ago, Vitalik Buterin revolutionized the nascent field by creating Ethereum. Ethereum was at the time a cryptographic protocol that would allow people to make distributed computations, without having to blindly trust the entire network. It was built on Bitcoin’s concept of blockchain: a distributed, unalterable public ledger of transactions secured through enormous amounts of computing power. But it was not just an alternative currency like Bitcoin. Ethereum was able to run any sort of computation, and could not only be used as a ledger for ETH, but as a database for distributed applications.

A "cryptographic cat" generated by Midjourney This technological breakthrough led to a lot of promises being made at the time:
- it would help us build smarter energy grids
- it would prevent voter fraud and pave the way to direct democracy
- it would simplify medical records
- it was the “Driver of the Fourth Industrial Revolution”
- it was the “Next Generation of the Internet”
Sadly, Ethereum had a few issues. First, it was extremely slow. Unlike traditional distributed systems, its fault-tolerant nature required every node to run every computation. This also made the system costly, as node owners were to be compensated with a “gas fee” for running computations. And in addition to that, a public read-only ledger is by definition a privacy nightmare, and would not fare well with laws like the GDPR or HIPAA. Everybody wanted a secure, decentralized internet, but nobody wanted a slow, costly, and overly-public internet.
While Ethereum has improved on many of its past technical issues, almost none of the wild promises made in 2017 have been fulfilled. However, Ethereum has been for the past few years one of the wildest avenues for financial speculators. Not only people can speculate on the price of ETH, but also on derivative tokens. After a wave of ICOs (the crypto equivalent of a penny stock entering the market), speculators decided to stop pretending to bet on anything that made sense and started trading jpeg files. The “CryptoKitties” application soon became the biggest hit on the Ethereum network.

A cryptokitty (I didn't pay for it) In 2023, everyone in the tech world is talking about Generative AI. Last year saw the release of multiple image generation models such as DALL-E 2, Stable Diffusion, and MidJourney. Also notably, OpenAI decided to tease the upcoming GPT-4 text generation model, by repackaging its GPT-3 model in the form of a chatbot: ChatGPT.
Just like Ethereum, those are truly impressive technological breakthroughs. In less than a decade, image generation models went from being able to create vaguely psychedelic patterns (DeepDream) to completely generating paintings in the style of any popular artist. In the same way, text generation models are now good enough, they could easily be mistaken for a human. Thankfully, ChatGPT kindly discloses it’s an AI language model when asked.
This progress in AI also comes with its set of crazy promises:
- generative language models could replace search engines
- AI could replace educators, financial analysts, software engineers, journalists, and graphic designers
- AI could give legal advice and potentially replace lawyers
- we have finally reached the “singularity”
This optimism seems to forget a few limitations of this technology, which I did ask ChatGPT itself to tell us about:
- Lack of understanding: Generative models may generate outputs that lack context, meaning or coherence.
- Computational costs: Training generative models can be computationally expensive and require large amounts of data and computing power.
- Bias in data: If the training data is biased, the model may generate outputs that reflect this bias.
- Mode collapse: Models may generate limited outputs and fail to cover the diversity of the data.
- Overfitting: Generative models may memorize the training data and fail to generalize to new data.
- Explainability: Generative models are often complex and difficult to understand or explain, making it challenging to assess their decision-making processes.
But just like Ethereum, it looks like ChatGPT is already attracting financial speculators. Last week, BuzzFeed, an usually pretty un-noticeable penny stock, rose by more than 300% on the simple news that the company would make use of generative AI. As the quote goes, “History never repeats itself, but it does often rhyme”.
subscribe via RSS