Self-hosting your code on Gitea
Afraid of GitHub suddenly enshittifying their product? The best way to shield yourself from that is to start self-hosting your code repositories. I have been running a self-hosted instance of Gitea for around two months, and so far the process has been pretty close to painless.

Preparing a machine
To install Gitea, all you need is a server with 2 GB RAM and 2 CPU cores. The official documentation even says a single GB of RAM is enough, which I can believe, but a bit of margin will not hurt.
Once your server is started and configured as you like, you’ll need to prepare a database. Gitea supports both MySQL and PostgreSQL. Personally, I like MySQL a lot, so I decided to go with that.
Using docker-compose, you can launch a MySQL container like this:
  mysql:
    image: mysql:8.4
    restart: always
    volumes:
      - ./mysql_data:/var/lib/mysql
    environment:
      MYSQL_ROOT_PASSWORD: "SUPER_SECRET_PASSWORD"
    healthcheck:
      test: mysqladmin ping -pSUPER_SECRET_PASSWORD
It will write data to the mysql_data folder and use the SUPER_SECRET_PASSWORD password.
You can then connect to this database by doing:
docker compose exec mysql mysql -uroot -pSUPER_SECRET_PASSWORD
From the database, you just have to create a gitea user on the gitea database:
CREATE USER 'gitea'@'%' IDENTIFIED BY 'TOP_SECRET_PASSWORD';

CREATE DATABASE gitea CHARACTER SET 'utf8mb4' COLLATE 'utf8mb4_bin';

GRANT ALL PRIVILEGES ON gitea.* TO 'gitea';
FLUSH PRIVILEGES;
Installing Gitea
Installing Gitea itself is very straightforward. It is a single process that you can launch through a single binary.
I use docker-compose to make networking easier, since I launched MySQL that way:
  gitea:
    image: docker.gitea.com/gitea:1.24.6-rootless
    restart: always
    volumes:
      - ./gitea-data:/var/lib/gitea
      - ./gitea-config:/etc/gitea
      - /etc/timezone:/etc/timezone:ro
      - /etc/localtime:/etc/localtime:ro
    ports:
      - "80:3000"
      - "2222:2222"
    depends_on:
      mysql:
        condition: service_healthy
It will write files and other unstructured data to gitea-data and read its configuration file from gitea-config.
HTTP traffic will be received on the port 80 and forwarded to 3000, while SSH traffic (used by git itself) will use port 2222.
We do not use port 22 to avoid conflicts with the server’s own SSH daemon.

As soon as the container is ready, you can head connect to Gitea with your web browser at your server’s IP/domain.
It will open an installation wizard, and you just have to follow the instructions.
Through this installation wizard, you should be able to connect to the previously configured MySQL server using the address mysql:3306 and the user you created earlier.
Setting up TLS
Just because we are self-hosting doesn’t mean we have to forgo basic security rules. Using Traefik is, in my opinion, the simplest way to set up TLS on your own server.
First we will need to launch a Traefik container:
  traefik:
    image: traefik:v3.5
    restart: always
    command:
      - "--providers.docker=true"
      - "--entrypoints.websecure.address=:443"
      - "--entrypoints.web.address=:80"
      - "--entrypoints.web.http.redirections.entryPoint.to=websecure"
      - "--entrypoints.web.http.redirections.entryPoint.scheme=https"
      - "--entrypoints.web.http.redirections.entrypoint.permanent=true"
      - "--certificatesresolvers.myresolver.acme.tlschallenge=true"
      - "--certificatesresolvers.myresolver.acme.email=YOUR@EMAIL.COM"
      - "--certificatesresolvers.myresolver.acme.storage=/letsencrypt/acme.json"
    ports:
      - "80:80"
      - "443:443"
    volumes:
      - ./letsencrypt:/letsencrypt
      - /var/run/docker.sock:/var/run/docker.sock
    depends_on:
      - gitea
This container will create two entry points:
- websecure, that will receive the TLS-traffic on port 443
- web, that will receive the unsecured traffic on port 80 and simply redirect to websecure
It will also use TLS challenges to prove you own the server to Let’s Encrypt and receive a valid certificate.
You will need to add labels on the gitea container to receive connections from the websecure entry point on port 3000:
  gitea:
    image: docker.gitea.com/gitea:1.24.6-rootless
    restart: always
    volumes:
      - ./gitea-data:/var/lib/gitea
      - ./gitea-config:/etc/gitea
      - /etc/timezone:/etc/timezone:ro
      - /etc/localtime:/etc/localtime:ro
    ports:
      - "2222:2222"
    labels:
      - "traefik.http.routers.gitea.rule=Host(`COOL.DOMAIN.COM`)"
      - "traefik.http.routers.gitea.entrypoints=websecure"
      - "traefik.http.routers.gitea.tls.certresolver=myresolver"
      - "traefik.http.services.gitea.loadbalancer.server.port=3000"
    depends_on:
      mysql:
        condition: service_healthy
Lastly, if you didn’t do it during installation, you should indicate the proper domain and URL in Gitea’s config.
It is found in the gitea-config/app.ini file.
[server]
SSH_DOMAIN = COOL.DOMAIN.COM
ROOT_URL = https://COOL.DOMAIN.COM/
DOMAIN = COOL.DOMAIN.COM
After restarting everything, crossing fingers and waiting a bit, you should receive a valid TLS certificate and be able to use Gitea safely.
Importing repositories from GitHub
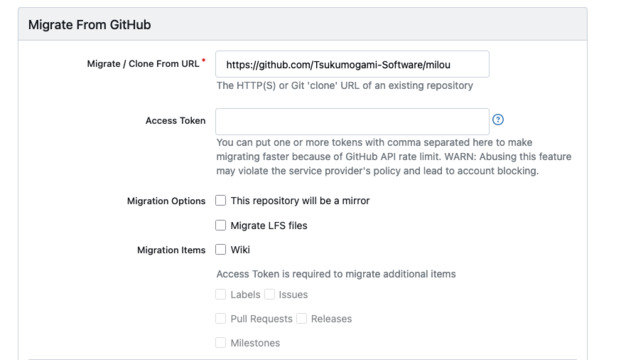
You can automatically import repositories from GitHub into Gitea. You can find the import tool on the + button located in the top right corner of your screen.
In addition to importing the code, Gitea can automatically retrieve existing labels, issues, pull requests, releases, and milestones using a Personal Access Token.
Compared to alternatives like GitLab, the killer feature of Gitea is that you do not need to rewrite your GitHub Action workflows.
So you can just leave your YAML files untouched in .github/workflows.
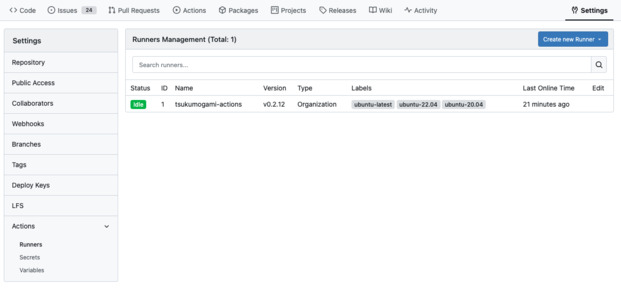
You will need to start some Runner processes to run your Actions.
First, you’ll have to generate a Runner registration token from your instance, organization or repository setting. As you may have guessed, a Runner with a registration token created from a repository will only be able to access this repository, while a runner created from the instance settings will be able to access every repository.
When you have a token, you can launch a runner container like this:
  gitea-runner:
    image: docker.io/gitea/act_runner:0.2.13
    environment:
      CONFIG_FILE: /config.yaml
      GITEA_INSTANCE_URL: "https://COOL.DOMAIN.COM"
      GITEA_RUNNER_REGISTRATION_TOKEN: "TOKEN_YOU_JUST_GENERATED"
      GITEA_RUNNER_NAME: "actions-runner"
    volumes:
      - ./runner-config.yaml:/config.yaml
      - ./runner-data:/data
      - /var/run/docker.sock:/var/run/docker.sock
For scalability and security reasons, this can, and probably should, be done from a second machine.
Backing up Gitea
While I’ve not encountered any issues operating Gitea so far, it is important to do regular backups to avoid losing work in case something goes wrong.
Gitea provides a built-in backup utility called gitea dump.
You can invoke it using Docker like that:
docker exec -u git -it -w --tempdir ./temp $(docker ps -qf 'name=gitea-1$') bash -c '/usr/local/bin/gitea dump -c /etc/gitea/app.ini'
Alternatively, you should be able to back up the MySQL database using mysqldump and make zip of Gitea local volumes.
Backups have to be copied to a service you trust, and that is independent of where your server is hosted. Every major cloud provider offers reasonably cheap object storage that can be used for this.