A sensible NeoVim configuration
I have been using NeoVim as my main editor for code since 2017. When discussing that with other engineers, a common complaint I hear about (Neo)Vim is that its configuration is overly complicated and confusing. In this post, I will try to address this point by showing simple steps to configure NeoVim into a development capable environment. This should allow you to get essential code editing features (ie. auto-completion, linting, search…) while keeping a minimalist and fast environment.
Installing NeoVim
First of all, install NeoVim by following the instructions on GitHub.
Open NeoVim by simply typing nvim in a terminal.
If you want to learn the basics of using vim, type :Tutor.
This will take you to the built-in tutorial.
Type the :CheckHealth command into NeoVim’s normal mode,
this will tell you if you need to set up anything special.
The most important dependency is to have python 3.6+ with the neovim pip package installed as well as node with the neovim npm package. Aside from that, you might need:
- python 2.7 with the neovim package
- ruby with the neovim gem
- perl with the Neovim::Ext module
Once everything is green, let’s go over some basic configurations

Basic configuration
First, you should create your configuration file at ~/.config/nvim/init.vim.
To be able to exit NeoVim’s terminal emulator (:term)
by simply pressing escape instead of the Ctrl+\ Ctrl+n combo, add this line to your config file (~/.config/nvim/init.vim):
tmap <Esc> <C-\><C-n>
map is the basic operator for mapping keyboard shortcuts.
tmap indicates that you want to map these keys in terminal mode only.
imap and nmap are respectively for insert and normal mode.
As an alternative to map you might have to sometimes use noremap to non-recursively map
(this is meant to avoid propagating to mappings you’ve already changed).
You’ll also want to be able to switch between windows without having to type a complete command:
nmap <silent> k :wincmd k<CR>
nmap <silent> j :wincmd j<CR>
nmap <silent> h :wincmd h<CR>
nmap <silent> l :wincmd l<CR>
These lines will map the switching of commands to Alt+hjkl.
(Note, on mac the only way I’ve managed to configure that was by using the characters output when I press Alt+hjkl on my keyboard).
Then, you can do a few tweaks to the appearance. I recommend displaying numbers next to lines, displaying line wrapping, and allowing horizontal scrolling.
set number
set nowrap
set sidescroll=1
You should then add some default tab configurations.
set tabstop=2
set softtabstop=2
set shiftwidth=2
set expandtab
set autoindent
set fileformat=unix
You also want to be able to override those configurations for each project with a local .nvimrc:
set exrc
And lastly, this line will allow scripts to run for specific file types:
:filetype plugin on
Plugins
Since NeoVim doesn’t have every feature developers usually need out of the box, you will need to be able to install plugins. For that purpose, we will use vim-plug. Installing by runnning:
sh -c 'curl -fLo "${XDG_DATA_HOME:-$HOME/.local/share}"/nvim/site/autoload/plug.vim --create-dirs \
       https://raw.githubusercontent.com/junegunn/vim-plug/master/plug.vim'
We will then do the first edit to your configuration file ~/.config/nvim/init.vim.
Add the following lines to install the plugins you will need:
call plug#begin('~/.vim/plugged')
Plug 'ctrlpvim/ctrlp.vim'
Plug 'tpope/vim-fugitive'
Plug 'vim-airline/vim-airline'
Plug 'tpope/vim-sleuth'
Plug 'neoclide/coc.nvim', {'branch':'release'}
call plug#end()
Each of the lines starting with Plug indicates the GitHub repository of a plugin.
Save your config file and type :PlugInstall in NeoVim’s normal mode to install them.
The plugins this will have installed are the following:
- coc.nvim gives you essential code-editing features like auto-completion using the language server protocol (like VScode)
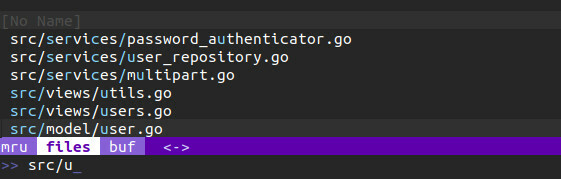
Ctrlp.vim
Ctrlp.vim is a very efficient file search plugin.
To use it simply press CTRL+P, this will open a file list that you can navigate with arrow keys. Typing any characters will make it search for matching files. You can use CTRL-F and CTRL-B to cycle between the different search modes (files, buffers, or most recently used). CTRL-R will allow you to type in regexes, while CTRL-D will search only in the filenames instead of the full path.
Use the following line to stop this plugin from indexing files outside of your source code:
let g:ctrlp_custom_ignore = '\v[\/](node_modules|target|dist|venv)|(\.(swp|ico|git|svn))$'
If you want to integrate more file handling into vim, you can also try NERDTree, which will provide you with a complete file system explorer.
Vim-fugitive
Vim-fugitive is a wrapper around git. It doesn’t require any special configuration to work, as long as you have a git CLI configured on your machine.
It will allow you to use any git command in vim using :G,
you can try it with :G status to display the result of git status.
One neat trick is that you can use :G grep to send the result of a git grep directly into vim’s quickfix list.
Vim-airline
Vim-airline will display the status of your current file as the last line of the editor. It’s basically plug and play and will even automatically detect other plugins you use (like ctrpl or fugitive) and integrate them.
The status line is divided into 6 sections (A, B, C, X, Y, Z) and can be customized with the statusline syntax:
let g:airline_section_b = 'Filetype: %y'

Vim-sleuth
Vim-sleuth aims at automatically adjusting indentation to the file you’re editing.
It works by simply overriding the shiftwidth and expandtab variables (which you can set manually in your config file if you want).
It doesn’t require any configuration either and generally works pretty well.
An alternative to it would be to use editorconfig-vim.
This plugin will instead follow the configuration written in a .editorconfig file at the root of a project.
Coc.nvim
Coc.nvim is really what will give you an IDE-like experience.
This plugin will give you auto-complection, linting, and formatting, using language servers protocols.
For that part, I recommend using the configuration sample they provide on GitHub.
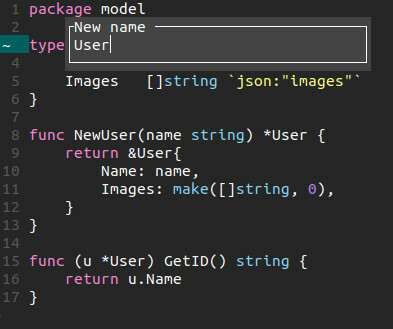
It will give you useful shortcuts to IDE-like features, like gd to go to a definition, gr to list references, and \t for automatic renaming.
To support every possible language, CoC has its own plugin system.
For example, :CocInstall coc-go will install the coc-go plugin for the Go programming language and use gopls.
Alternatively, NeoVim now has built-in support for LSPs, you can read more about how to configure that in this repo. As this solution still requires to install a few plugins for auto-completion, I consider CoC to be the simplest option around at the moment.
Theming
Of course, everyone loves some colors!
Vim and Neovim have a ton of themes that you can example at vimcolorscheme.
Each one can be installed with vim-plug like any other plugin.
Once it is installed you can use the colorscheme function to enable it from your vim config file.
For example with the dracula theme:
colorscheme dracula
Conclusion
This post is only scratching the surface of what can be done with NeoVim. As you use this editor more and more, you will probably want to use different configurations, and will probably end up with a few more (or fewer plugins).